Index
Introduction
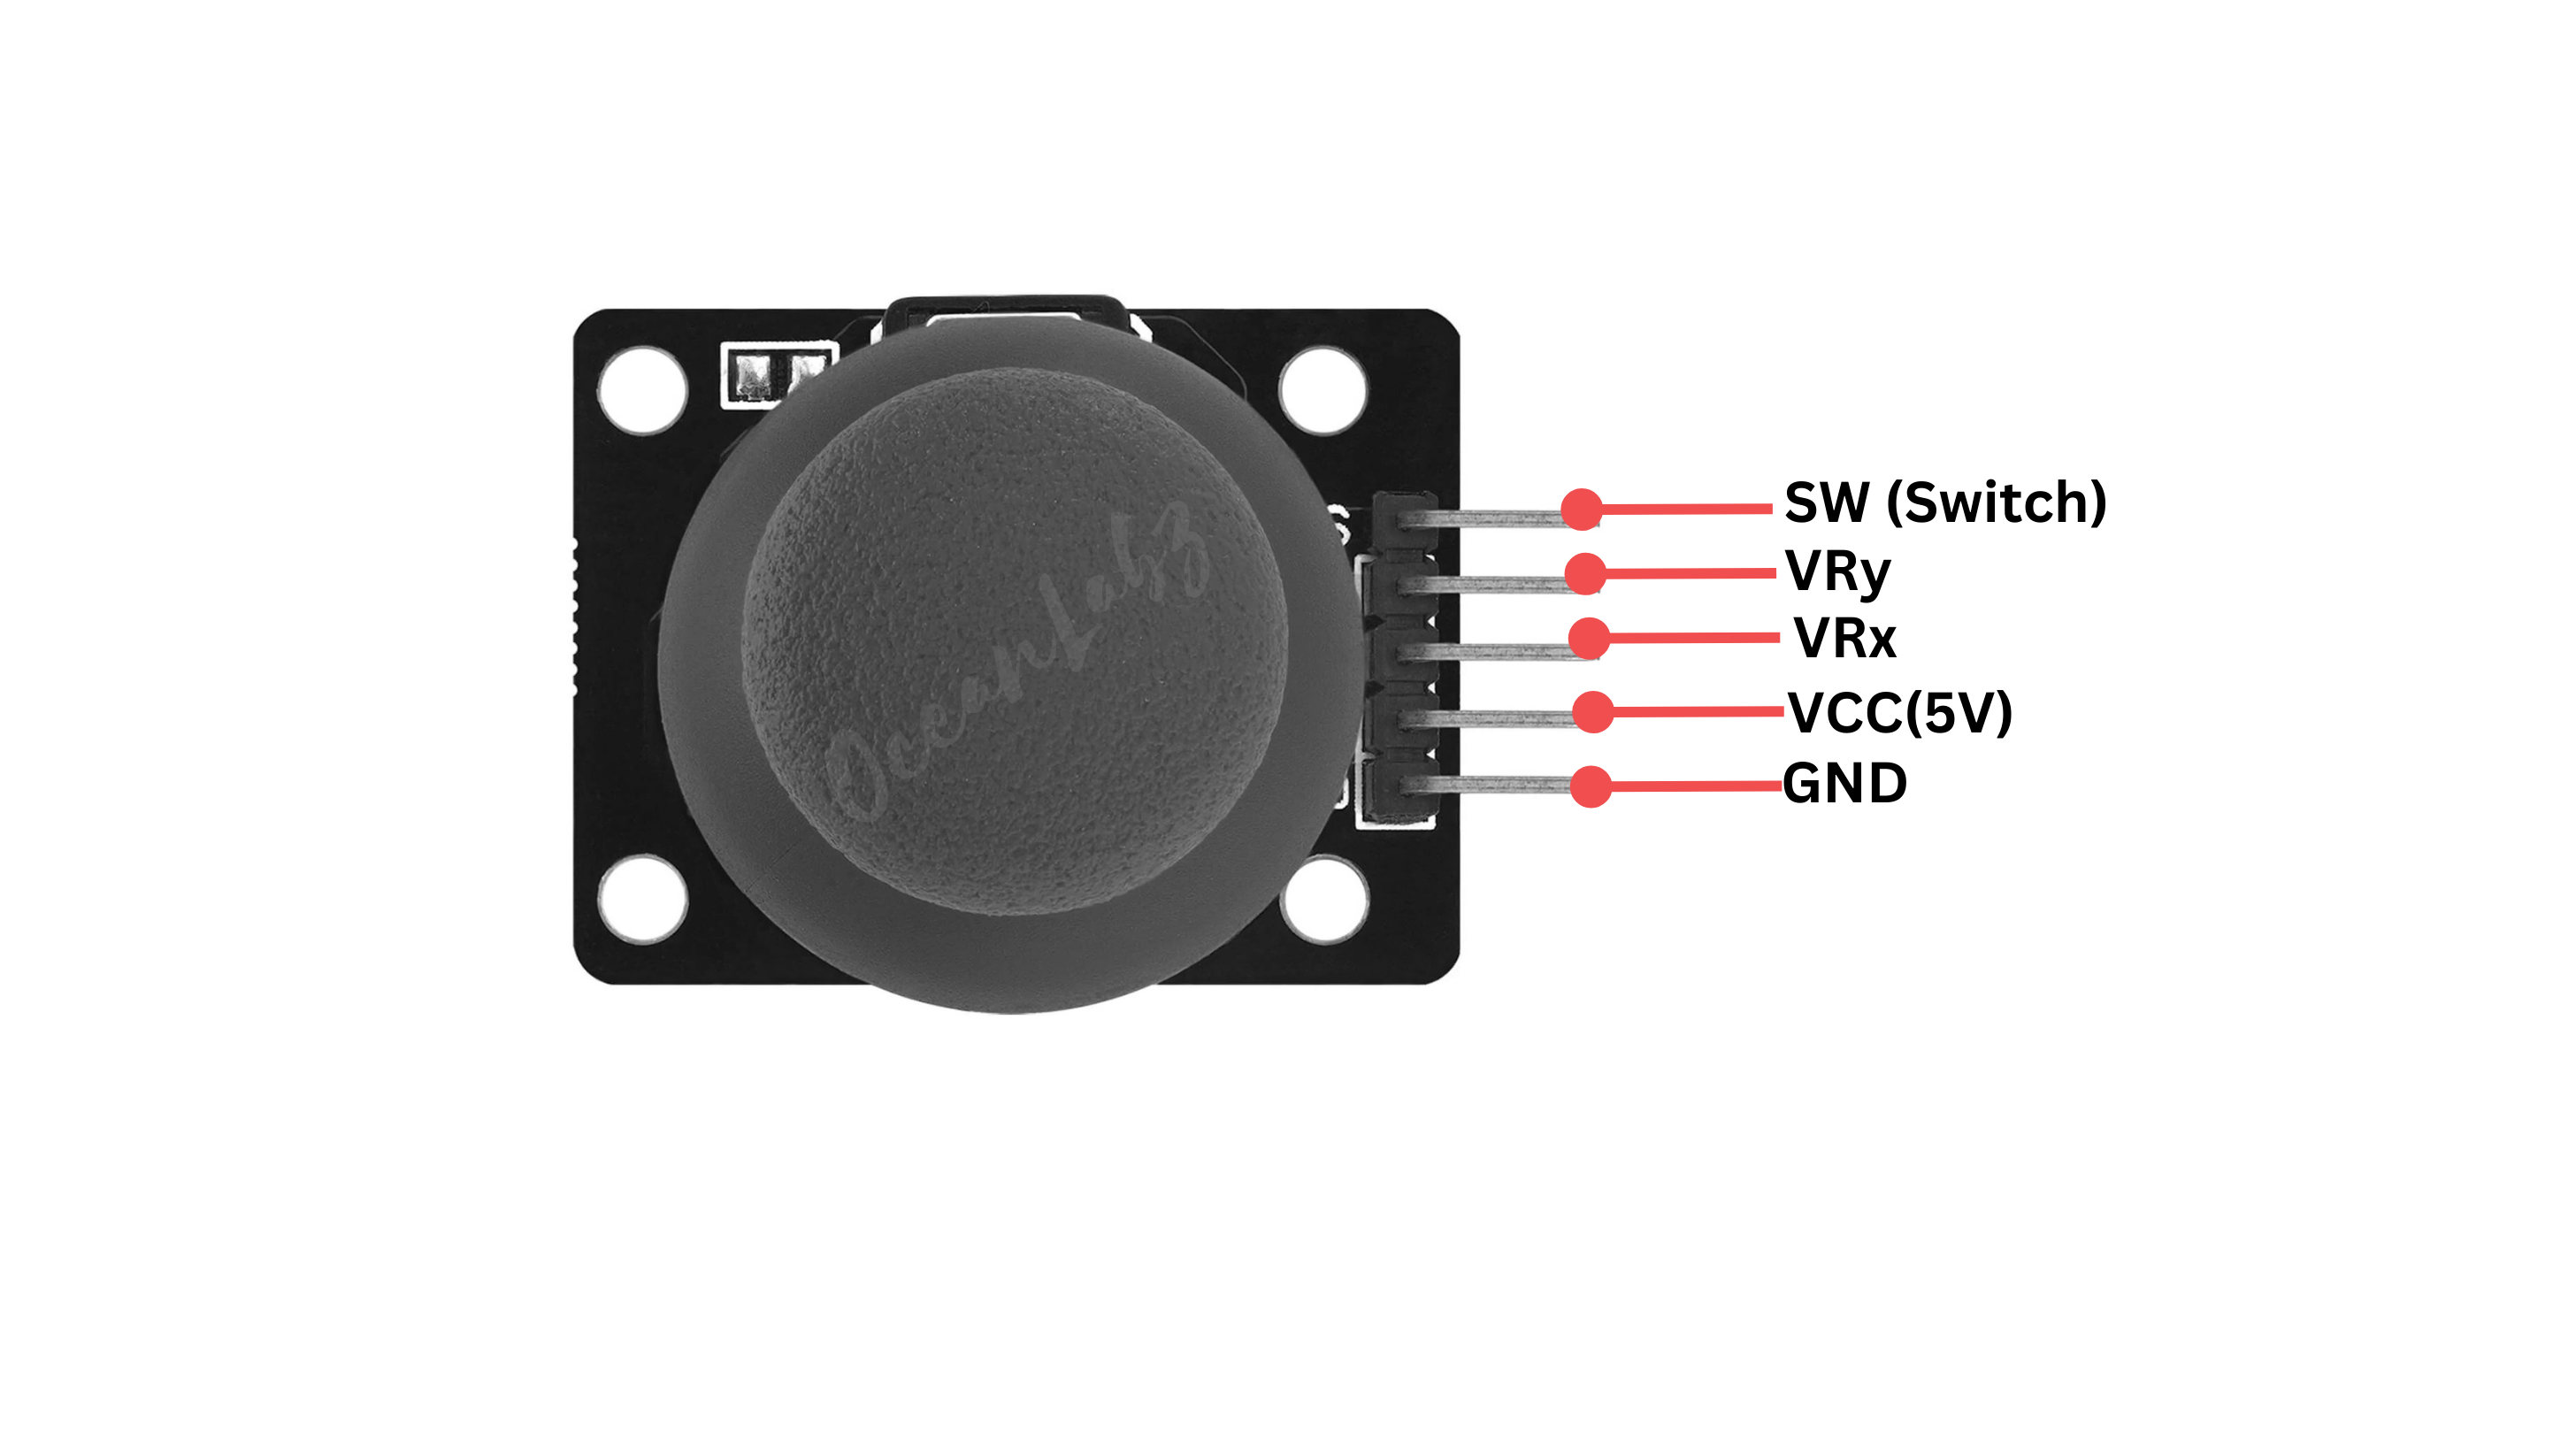
The Joystick module consists of two potentiometers (X and Y axes) and a push-button switch.
It outputs analog values for movement along the X and Y axes, and a digital signal for the button press.
Commonly used in robotics, gaming, and interactive control systems.
We’ll read the analog values and detect button presses using the ESP32 and Arduino IDE.
Required Components
- ESP32 Board
- Joystick module
- Jumper wires
- Breadboard (optional)
Pinout
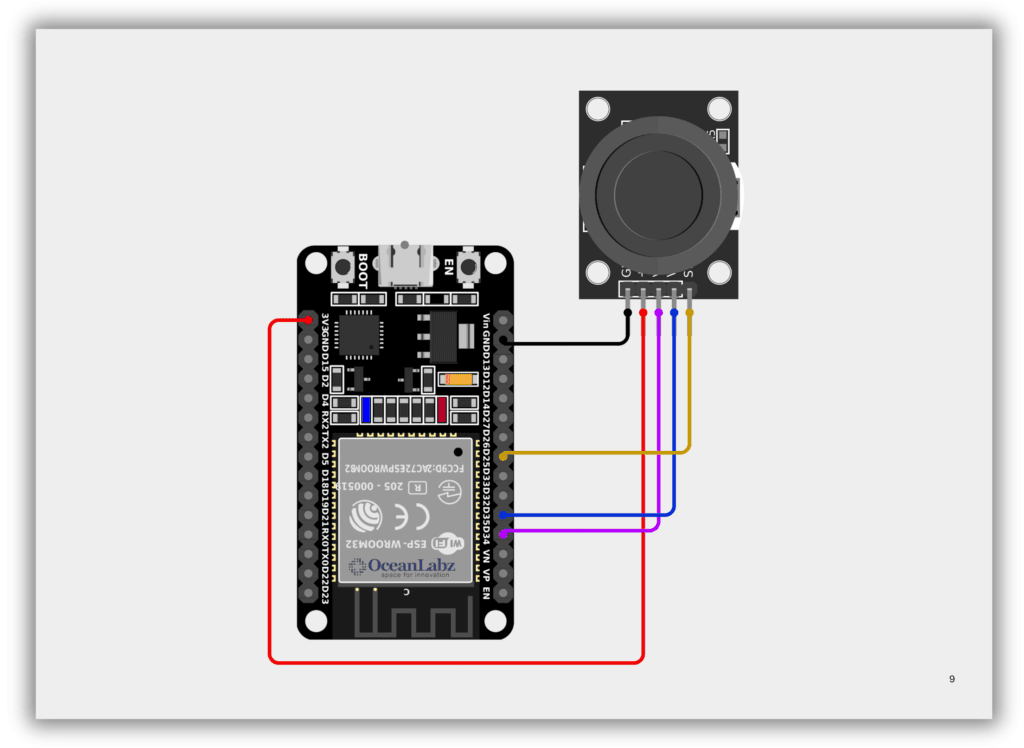
Circuit Diagram / Wiring
- Joystick (5V) → ESP32 3.3
- Joystick (GND) → ESP32 GND
- Joystick (VRx) → ESP32 GPIO 34
- Joystick (VRy) → ESP32 GPIO 35
- Joystick (SW) → ESP32 GPIO 25
Code / Programming
/*
Filename: ol_joystick_read.ino
Description: Reads X and Y analog values and button state from a joystick module
Author: www.oceanlabz.in
Modification: 1/4/2025
*/

// Define pin connections
const int joyX = 34;        // Analog pin for X-axis
const int joyY = 35;        // Analog pin for Y-axis
const int buttonPin = 25;   // Digital pin for joystick button

void setup() {
  Serial.begin(115200);                  // Initialize serial monitor
  pinMode(buttonPin, INPUT_PULLUP);     // Enable internal pull-up for button
}

void loop() {
  int xValue = analogRead(joyX);               // Read X-axis analog value
  int yValue = analogRead(joyY);               // Read Y-axis analog value
  int buttonState = digitalRead(buttonPin);    // Read button state

  Serial.print("X: ");
  Serial.print(xValue);
  Serial.print(" | Y: ");
  Serial.print(yValue);
  Serial.print(" | Button: ");
  Serial.println(buttonState == LOW ? "Pressed" : "Released");

  delay(300);  // Short delay for stability
}
Explanation
- The joystick outputs analog signals from the X and Y axes, read using
analogRead()on ESP32 ADC pins. - The built-in button outputs a digital LOW signal when pressed, read using
digitalRead(). - Commonly used for controlling direction, speed, and interactive inputs in robotics or games.
Troubleshooting
- Ensure the joystick’s VCC is connected to 3.3V, not 5V (ESP32 is 3.3V logic).
- Use only ADC-compatible pins like GPIO34, 35, or 25 for analog input.
- If the button always shows “pressed”, try using
INPUT_PULLUPand check wiring to SW and GND.
Project 1: ESP32 Joystick-Controlled Web Shooter Game
Introduction
This project turns an ESP32 and joystick module into a wireless game controller for a browser-based shooting game.
It hosts a Wi-Fi access point and game webpage, allowing users to connect directly without the internet.
Joystick movements control the player’s position, and button presses fire bullets at falling enemies.
All game logic runs in the browser, while the ESP32 streams real-time joystick data via JSON.
Required Components
- ESP32 Board
- Joystick module
- Jumper wires
- Breadboard (optional)
Code / Programming
/*
  Filename: ol_Web_Shooter_game.ino
  Description: ESP32 creates a SoftAP and serves a web-based joystick shooter game. Joystick reads analog X/Y and button input to control the game.
  Author: www.oceanlabz.in
  Modification: 1/4/2025
*/


#include <WiFi.h>
#include <WebServer.h>

const char* ssid = "ESP32 JOUSTICK";
const char* password = "12345678";

#define VRX_PIN 34
#define VRY_PIN 35
#define SW_PIN 25

WebServer server(80);

void handleRoot() {
  String html = R"rawliteral(
    <!DOCTYPE html><html><head><meta charset="UTF-8">
    <title>Joystick Shooter Game</title>
    <style>
      body { margin:0; background:#111; color:white; text-align:center; overflow:hidden; }
      canvas { background:#222; display:block; margin:20px auto; border:2px solid #444; }
    </style></head><body>
    <h2>🕹️ Joystick Shooter</h2>
    <h3 id="score">Score: 0</h3>
    <canvas id="game" width="400" height="400"></canvas>
    <script>
      const canvas = document.getElementById("game");
      const ctx = canvas.getContext("2d");

      let player = { x: 200, y: 350, size: 15 };
      let bullets = [];
      let enemies = [];
      let lastFire = 0;
      let score  = 0;
      let explosions = [];

      function drawPlayer() {
        ctx.fillStyle = "#00ffcc";
        ctx.fillRect(player.x - player.size, player.y - player.size, player.size * 2, player.size * 2);
      }

      function drawBullets() {
        ctx.fillStyle = "#ffff00";
        bullets.forEach(b => {
          ctx.fillRect(b.x - 2, b.y - 10, 4, 10);
          b.y -= 5;
        });
        bullets = bullets.filter(b => b.y > 0);
      }

      function updateScoreDisplay() {
        document.getElementById("score").innerText = "Score: " + score;
      }


      function drawEnemies() {
        ctx.fillStyle = "#ff4444";
        enemies.forEach(e => {
          ctx.fillRect(e.x - 10, e.y - 10, 20, 20);
          e.y += 1;
        });
        enemies = enemies.filter(e => {
          if (e.y >= canvas.height) {
            score--;
            updateScoreDisplay();
            return false;  // remove enemy
          }
          return true;
        });

      }

      function checkCollision() {
        bullets.forEach((b, bi) => {
          enemies.forEach((e, ei) => {
            if (Math.abs(b.x - e.x) < 10 && Math.abs(b.y - e.y) < 10) {
              // Save enemy's position before removing it
              let ex = e.x;
              let ey = e.y;

              // Remove bullet and enemy
              bullets.splice(bi, 1);
              enemies.splice(ei, 1);

              // Add explosion at hit location
              explosions.push({ x: ex, y: ey, radius: 1, alpha: 1 });

              // Score update
              score++;
              updateScoreDisplay();

            }
          });
        });
      }

      async function updateJoystick() {
        const res = await fetch("/joy");
        const data = await res.json();
        player.x += data.x * 0.5;
        player.y += data.y * 0.5;

        // Clamp
        player.x = Math.max(10, Math.min(390, player.x));
        player.y = Math.max(10, Math.min(390, player.y));

        // Fire
        if (data.fire === 1 && Date.now() - lastFire > 100) {
          bullets.push({ x: player.x, y: player.y });
          lastFire = Date.now();
        }
      }

      function spawnEnemy() {
        if (Math.random() < 0.05) {
          enemies.push({ x: Math.random() * 380 + 10, y: 0 });
        }
      }

      function gameLoop() {
        ctx.clearRect(0, 0, canvas.width, canvas.height);
        drawPlayer();
        drawBullets();
        drawEnemies();
        checkCollision();
        spawnEnemy();
        drawExplosions();
      }

      function drawExplosions() {
        for (let i = 0; i < explosions.length; i++) {
          let ex = explosions[i];
          ctx.beginPath();
          ctx.arc(ex.x, ex.y, ex.radius, 0, Math.PI * 2);
          ctx.fillStyle = `rgba(255, 255, 0, ${ex.alpha})`;
          ctx.fill();
          ex.radius += 2;
          ex.alpha -= 0.05;
        }

        // Remove finished explosions
        explosions = explosions.filter(ex => ex.alpha > 0);
      }


      setInterval(() => {
        updateScoreDisplay();
        gameLoop();
        updateJoystick();
      }, 50);  // 20 FPS
    </script>
    </body></html>
  )rawliteral";

  server.send(200, "text/html", html);
}

void handleJoy() {
  int rawX = analogRead(VRX_PIN);
  int rawY = analogRead(VRY_PIN);
  int dx = map(rawX, 0, 4095, 10, -10);
  int dy = map(rawY, 0, 4095, -10, 10);
  int sw = digitalRead(SW_PIN) == LOW ? 1 : 0; // Active LOW

  String json = "{";
  json += "\"x\":" + String(dx) + ",";
  json += "\"y\":" + String(dy) + ",";
  json += "\"fire\":" + String(sw);
  json += "}";

  server.send(200, "application/json", json);
}

void setup() {
  Serial.begin(115200);
  pinMode(SW_PIN, INPUT_PULLUP);
  // WiFi.begin(ssid, password);
  WiFi.softAP(ssid, password);
  // Serial.print("Connecting");
  // while (WiFi.status() != WL_CONNECTED) {
  //   delay(500); Serial.print(".");
  // }
  // Serial.println("\nIP: " + WiFi.localIP().toString());
  IPAddress IP = WiFi.softAPIP();
  Serial.print("Access Point IP address: ");
  Serial.println(IP);

  server.on("/", handleRoot);
  server.on("/joy", handleJoy);
  server.begin();
}

void loop() {
  server.handleClient();
}
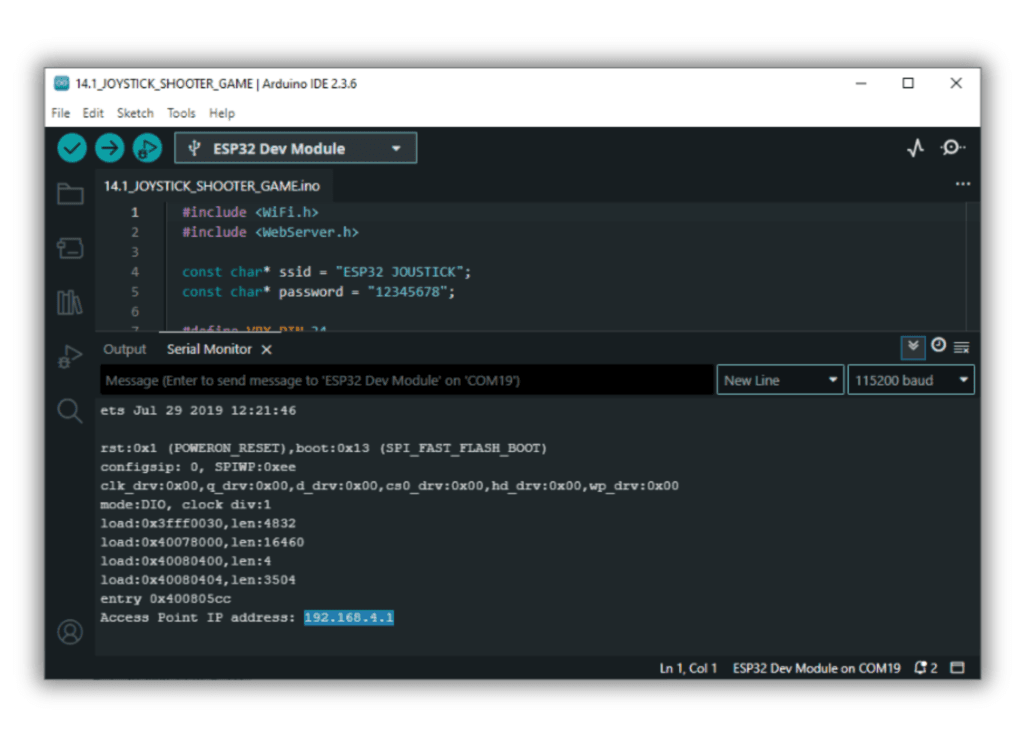
Accessing the Web Server
After uploading the sketch, open the Serial Monitor at 115200 baud and press the RESET button on the ESP32. If everything is fine, it will display the dynamic IP address obtained from your ESP32 as well as the “Access Point IP address:” message.
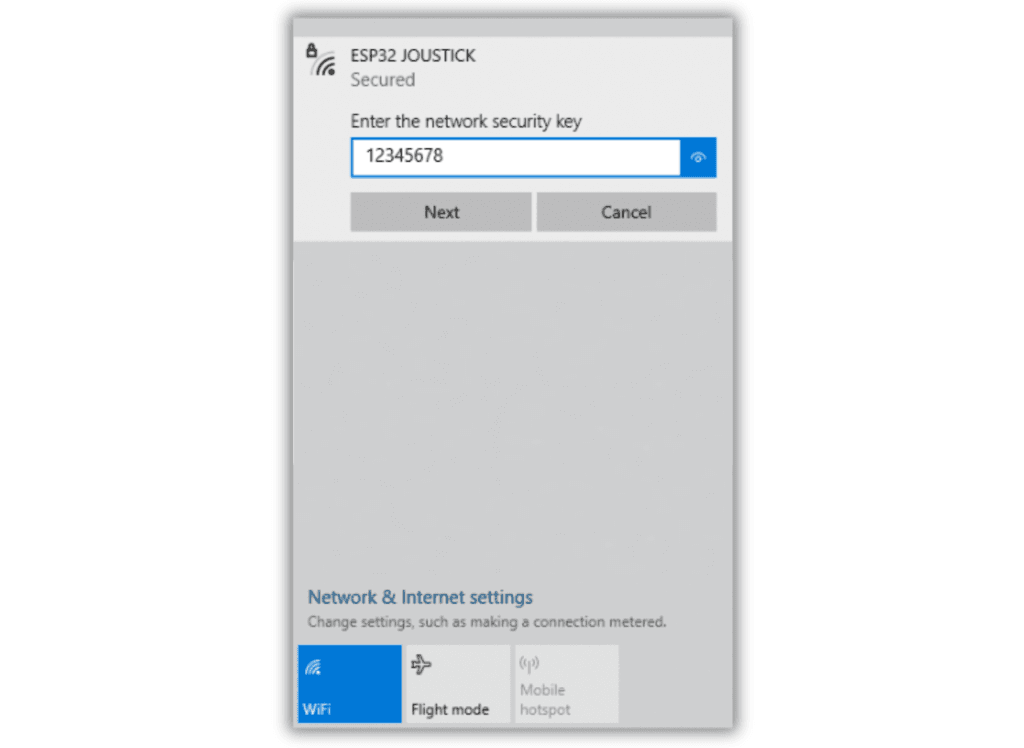
Next, you need to connect your ESP32 to your computer via Wi-Fi. To do this, go to your system’s Wi-Fi settings and select the ESP32 JOYSTICK network and password 12345678.
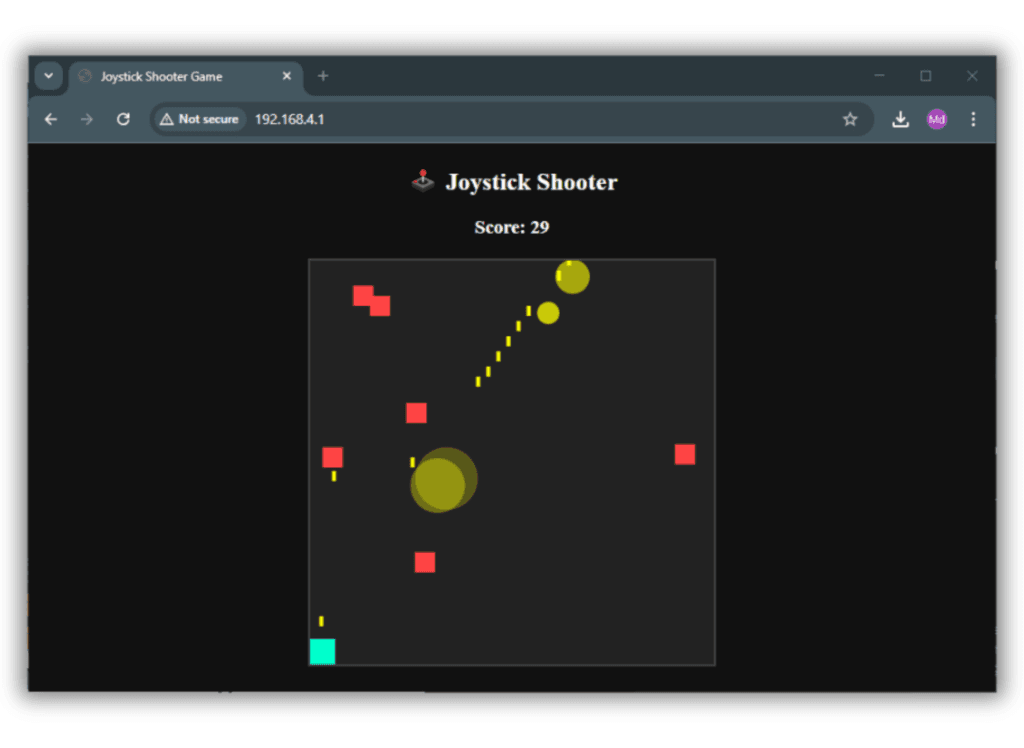
Next, launch a browser and navigate to the IP address displayed on the serial monitor. You’ll see a webpage with a joystick-controlled interface where movements and button presses are displayed in real time.
Explanation
- The ESP32 creates a Wi-Fi hotspot and serves a shooting game webpage to connected devices.
- A joystick module sends real-time movement and button data to control the game character.
- The web game reads this data using AJAX and updates player actions like moving and shooting.
Troubleshooting
- Can’t connect to Wi-Fi? Make sure you’re connecting to “ESP32 JOUSTICK” with password “12345678”.
- No player movement? Check joystick wiring and verify
VRX_PIN,VRY_PIN, andSW_PINare correct. - Game not loading? Ensure your browser is accessing the ESP32’s IP (usually 192.168.4.1) via a local device.