Index
Watch the Video Tutorial
This tutorial is available in video format (watch below) and in written format (continue reading this page).
If you have any problems during the installation procedure, take a look at the ESP32 Troubleshooting Guide.
Introduction
If you’re looking to build a wireless audio system using the powerful and affordable ESP32, this guide is for you. In this post, you’ll learn how to stream high-quality audio over Bluetooth using the ESP32 and output it to an external DAC via the I2S protocol. Whether you’re making a DIY Bluetooth speaker, audio receiver, or just experimenting with wireless audio, this tutorial will walk you through the essential steps.
What You’ll Learn
- Basics of Bluetooth A2DP audio streaming with ESP32
- Setting up I2S output on the ESP32
- Connecting and using an external DAC (like CJMCU1334)
- Playing audio from your smartphone to ESP32
Hardware Required
- ESP32 Development Board
- External DAC (CJMCU1334)
- Amplifier (PAM8403)
- Speakers
- Power supply (USB or battery)
- Jumper wires and breadboard
Understanding Bluetooth Audio with ESP32
A2DP (Advanced Audio Distribution Profile)
A2DP stands for advanced audio distribution profile. It’s like the Bluetooth protocol that’s responsible for sending high quality stereo audio from one device to another. So when you stream music from your phone to say Bluetooth headphones or a wireless speaker, yeah, that’s A2DP doing all the work in the background. Now in our case what happens is your phone will be the A2DP source meaning it sends the music and the ES P32 will act as the sync. Uh basically it receives that audio stream.
DAC – Digital to Analog Converter
Let’s talk about something super important in your ESP32 audio project — the DAC, or Digital to Analog Converter. When your ESP32 receives audio over Bluetooth, it’s just digital data — basically a stream of 1s and 0s. But here’s the thing: speakers don’t understand binary. They need analog signals — smooth, continuous voltage waves — to produce sound. That’s where the DAC comes in. Its job is to convert digital audio signals into analog waveforms, which your speaker or amplifier can actually play. While the ESP32 has a built-in DAC, it’s not ideal for high-quality audio — it tends to be a bit noisy and limited in resolution. So for better sound performance, we’ll be using an external DAC module, like the CJMCU-1334. It delivers cleaner, more accurate audio output, perfect for music or voice.
I2S Inter-IC Sound
The ESP32 features a built-in I2S peripheral for high-quality digital audio transmission.
It supports two I2S controllers (I2S0 and I2S1) that can be configured as master or slave.
Sample rates range from 8 kHz to 192 kHz, ideal for voice and music.
It uses three main signals: BCLK (bit clock), LRCK (left-right clock), and DOUT (audio data).
I2S pins are software-configurable, allowing flexible GPIO assignment in your projects.
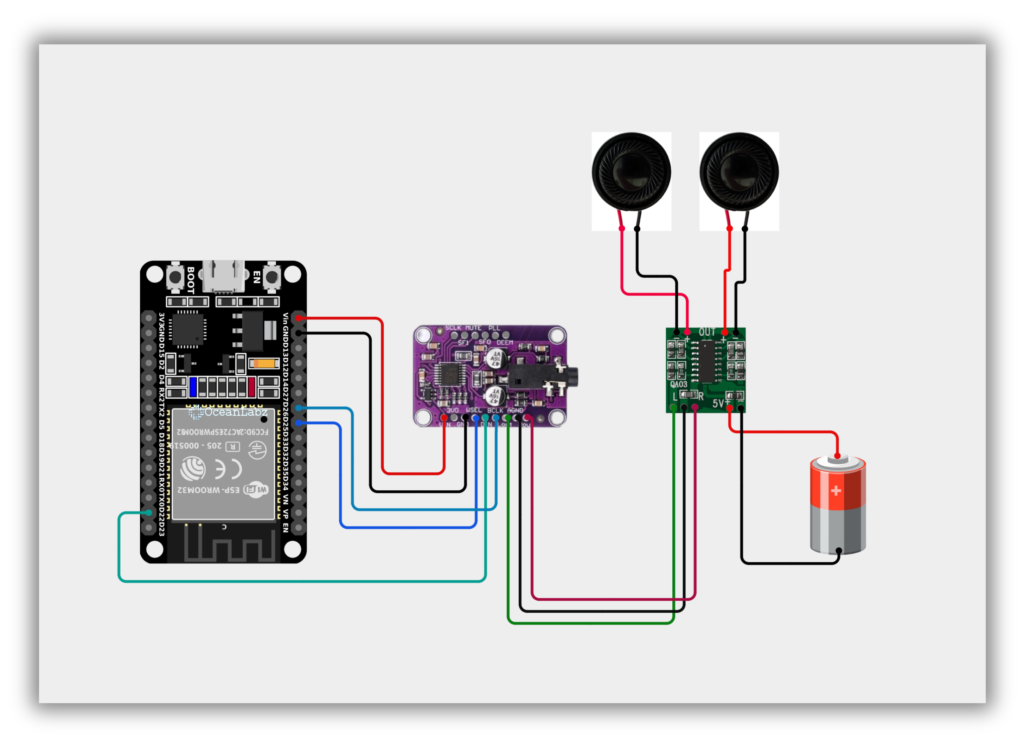
Circuit Diagram / Wiring
- ESP32 → CJMCU-1334 (I2S Interface)
- GPIO 26 of ESP32 → BCLK on CJMCU-1334
- GPIO 22 of ESP32 → DIN on CJMCU-1334
- GPIO 25 of ESP32 → WSEL on CJMCU-1334
- CJMCU-1334 → PAM8403
- LOUT of CJMCU-1334 → L-IN on PAM8403
- ROUT of CJMCU-1334 → R-IN on PAM8403
- GND of CJMCU-1334 → GND on PAM8403
- PAM8403 → Speakers
- L-OUT → Left Speaker
- R-OUT → Right Speaker
- PAM8403 VCC → 5V Power
- GND → Ground
ESP32 Code
- Go to the “Libraries” tab on the left-hand side of the screen.
- Click on the “Library Manager” button (book icon) at the top of the Libraries tab.
- In the Library Manager window, type “BluetoothA2DPSink” in the search bar.
- Locate the “BluetoothA2DPSink” library click on the “Install” button next to it.
- Wait for the library to be installed, and you’re ready to use the BluetoothA2DPSink library in your projects.
#include "BluetoothA2DPSink.h"

BluetoothA2DPSink a2dp_sink;

// I2S audio configuration
i2s_config_t i2s_config = {
  .mode = (i2s_mode_t)(I2S_MODE_MASTER | I2S_MODE_TX),
  .sample_rate = 44100,
  .bits_per_sample = I2S_BITS_PER_SAMPLE_16BIT,
  .channel_format = I2S_CHANNEL_FMT_RIGHT_LEFT,
  .communication_format = I2S_COMM_FORMAT_I2S,
  .intr_alloc_flags = 0,
  .dma_buf_count = 8,
  .dma_buf_len = 64,
  .use_apll = false,
  .tx_desc_auto_clear = true,
  .fixed_mclk = 0
};

// I2S pin configuration (customizable)
i2s_pin_config_t i2s_pins = {
  .bck_io_num = 26,   // Bit Clock
  .ws_io_num = 25,    // Word Select (L/R Clock)
  .data_out_num = 22, // Audio Data
  .data_in_num = I2S_PIN_NO_CHANGE
};

void setup() {
  Serial.begin(115200);
  Serial.println("Starting Bluetooth Audio...");

  // Configure I2S
  a2dp_sink.set_i2s_config(i2s_config);
  a2dp_sink.set_pin_config(i2s_pins);

  // Start Bluetooth A2DP
  a2dp_sink.start("MyMusic"); // Bluetooth device name
}

void loop() {
  // Nothing needed here
}
Test It
- Upload the code.
- Open Bluetooth on your phone, and connect to MYMusic.
- Play a song — sound will be heard from both speakers!
Tips
- Keep wires short between ESP32 and DAC to reduce noise.
- Mount the PAM8403 and speakers on a small wooden or acrylic enclosure for better sound.
- Use heat sinks on PAM8403 if driving near max volume.
