Index
Introduction
The Blinking LED project is the simplest way to get started with ESP32. It helps you understand digital output control using code. In this project, we will turn an LED on and off at regular intervals.
Prerequisites / Requirements
If you are new to ESP32, first go through the Introduction to ESP32 before starting this project.
Required Components
- ESP32 Board
- LED
- 220Ω Resistor
- Jumper Wires
- Breadboard
Pinout
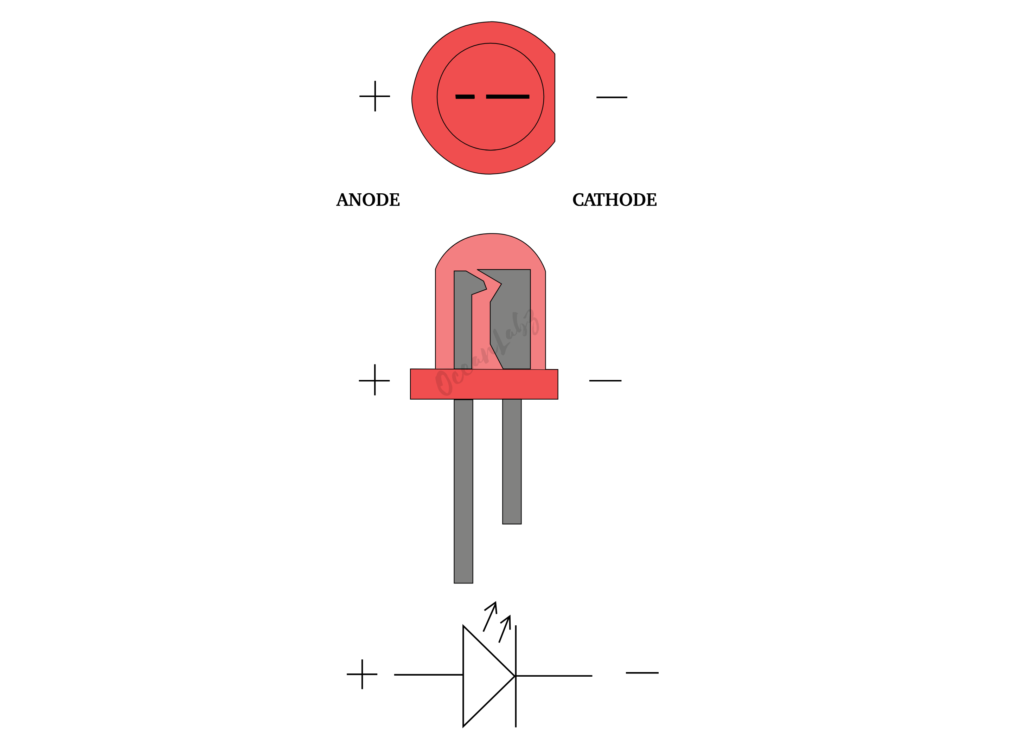
- LED Anode (+)
- LED Cathode (-)
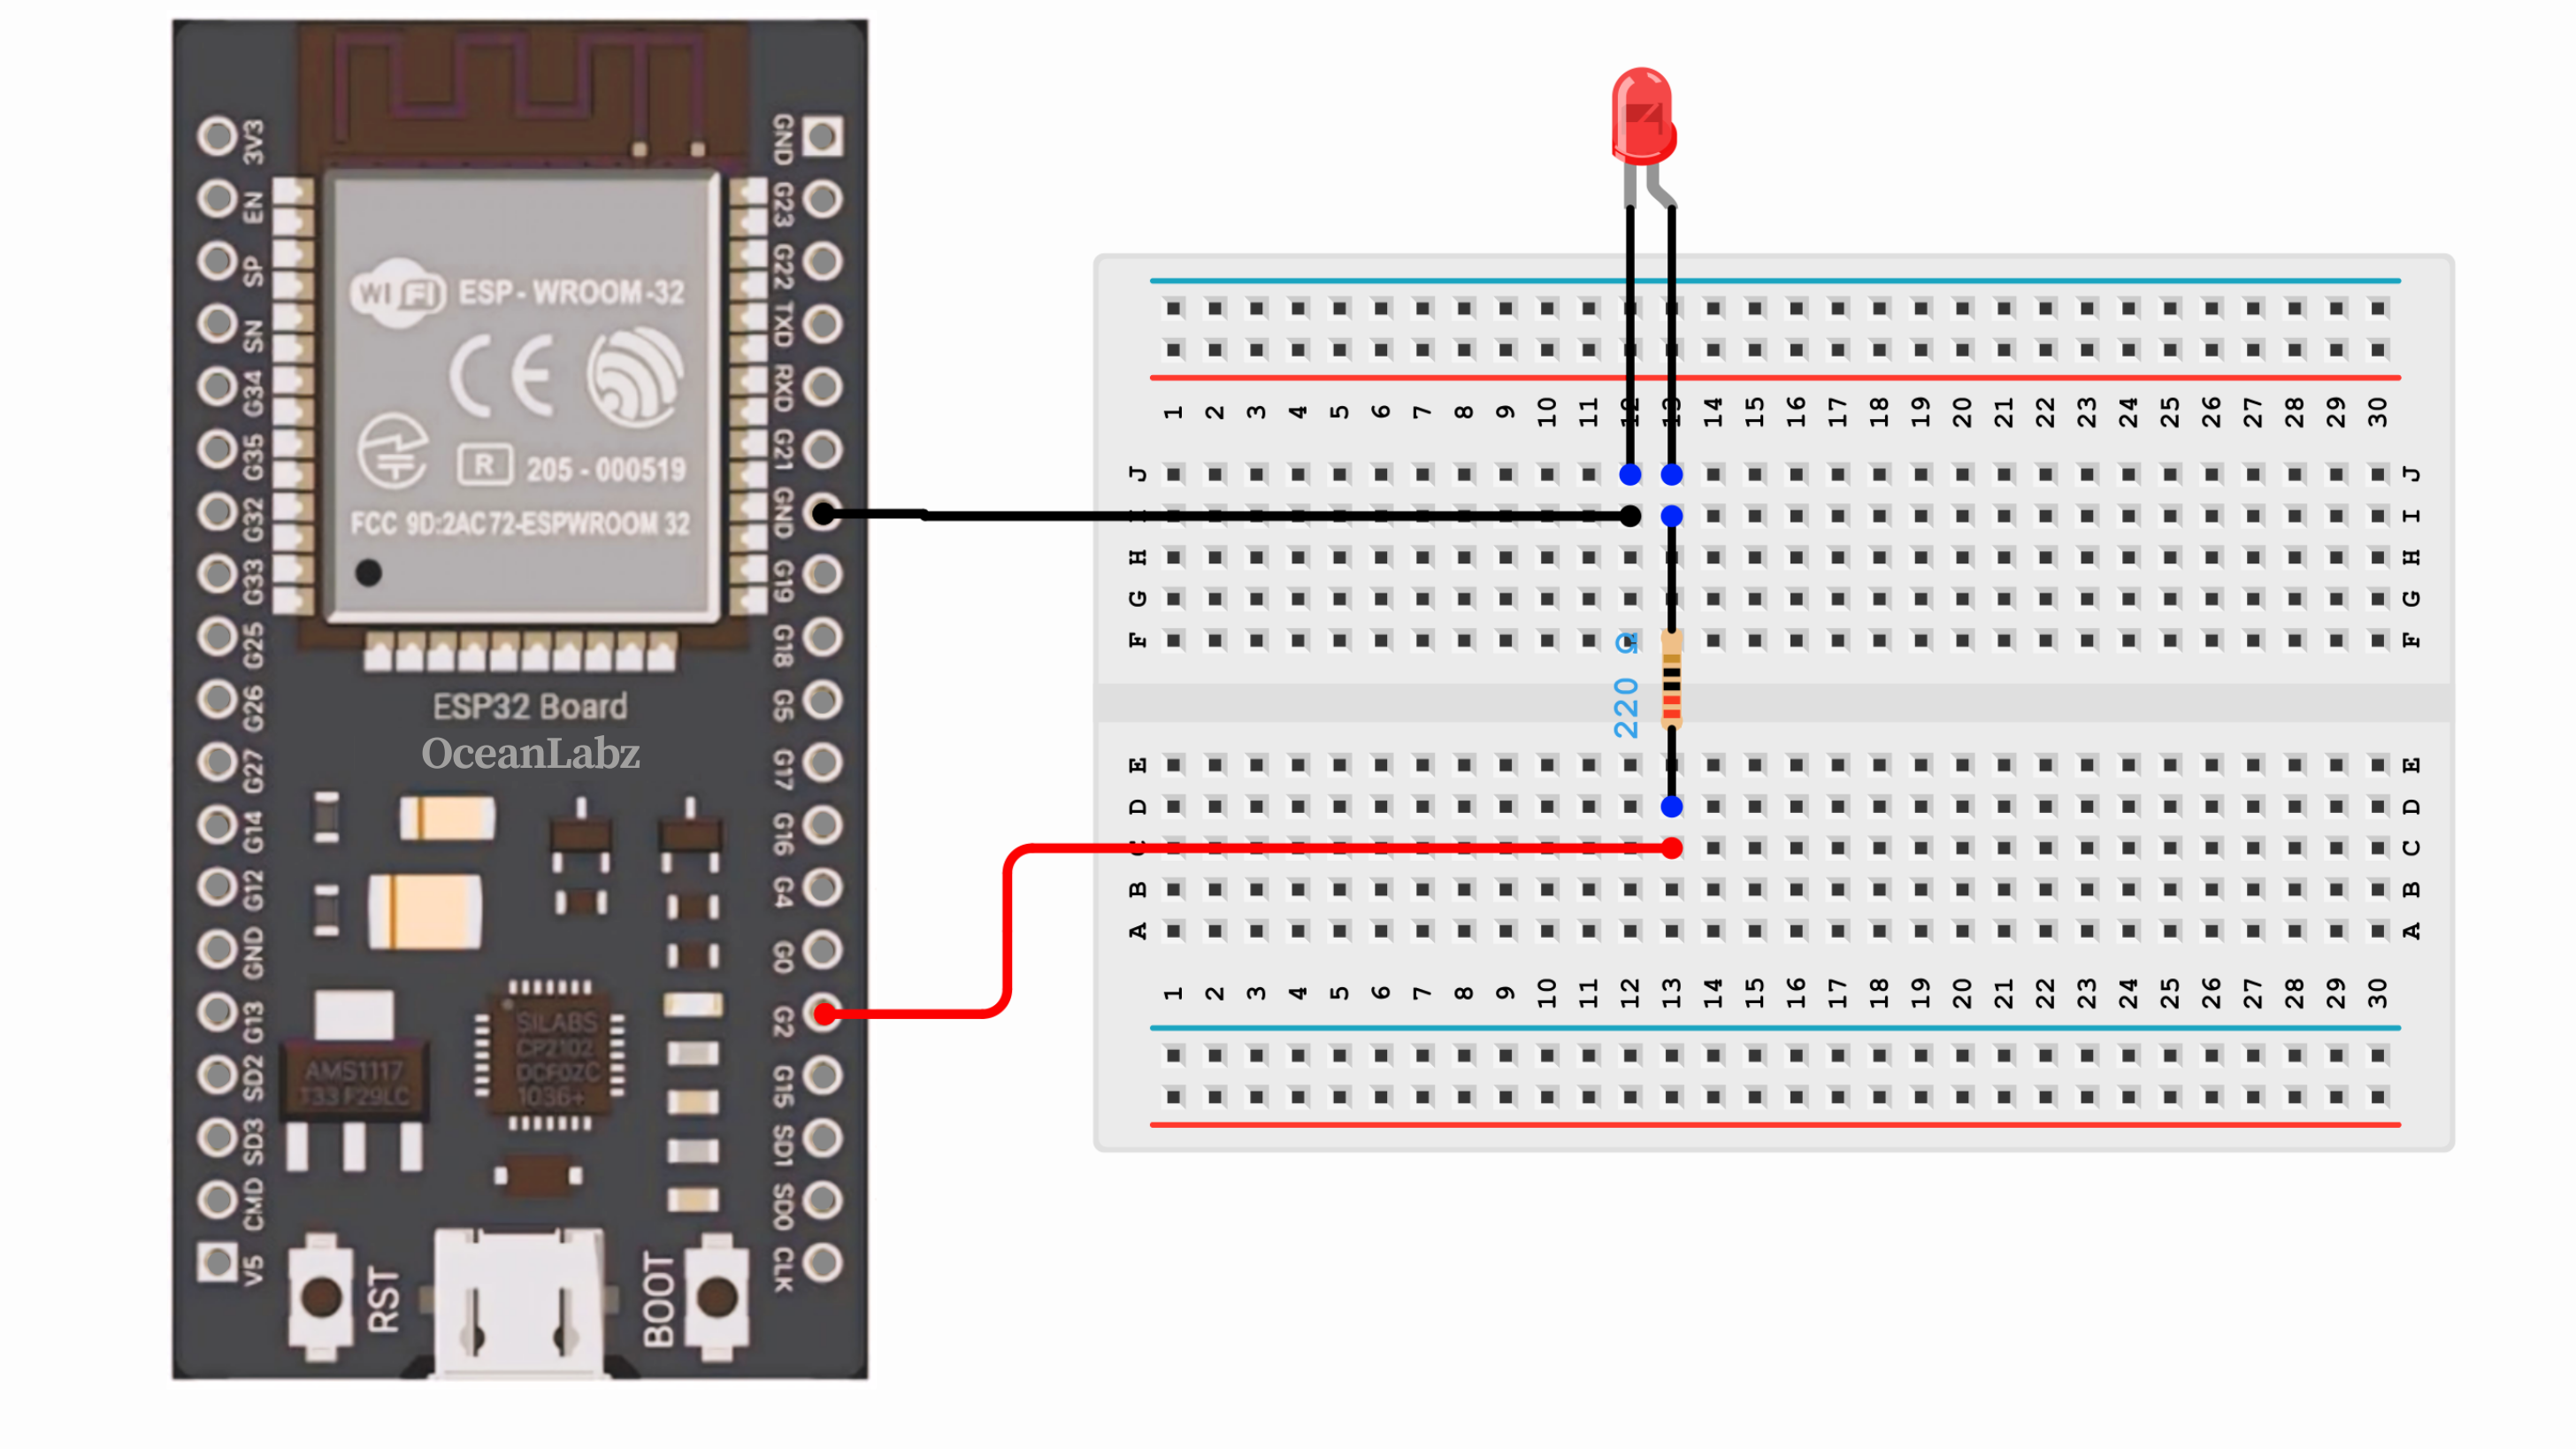
Circuit Diagram
- ESP32 GPIO 2 → 220Ω Resistor → LED (Anode +)
- ESP32 GND → LED (Cathode -)
Code / Programming
/*
Filename: ol_blink_LED.ino
Description: Simple LED blink code for ESP32. Blinks an LED connected to GPIO2 every second.
Author: www.oceanlabz.in
Modification: 1/4/2025
*/

#define LED_PIN 2  // Define LED pin

void setup() {
  pinMode(LED_PIN, OUTPUT);  // Set LED pin as output
}

void loop() {
  digitalWrite(LED_PIN, HIGH);  // Turn LED ON
  delay(1000);                  // Wait 1 second
  digitalWrite(LED_PIN, LOW);   // Turn LED OFF
  delay(1000);                  // Wait 1 second
}
Explanation
- The LED is connected to GPIO 2 and controlled as an output.
- The loop() function turns the LED on and off every second.
- The delay(1000) function creates a 1-second interval between each LED state.
Troubleshooting
- LED Not Blinking? Check if the resistor is connected correctly.
- ESP32 Not Uploading? Hold the BOOT button while uploading.
- Wrong GPIO Pin? Ensure the LED is connected to GPIO 2 as per the code.
Project 1: Smooth Breathing LED Effect with Cosine Easing
Introduction
This project creates a smooth breathing LED effect using cosine easing on an ESP32.
It gradually increases and decreases the LED brightness in a natural, eye-pleasing pattern.
The analogWrite() function is used to adjust brightness based on a cosine wave.
This kind of effect is commonly seen in power indicators and ambient lighting systems.
Required Components
- ESP32 Board
- LED
- 220Ω Resistor
- Jumper Wires
- Breadboard
Code / Programming
/*
Filename: ol_smooth_breathing_LED.ino
Description: Creates a smooth breathing LED effect using cosine easing on ESP32. LED connected to GPIO2 fades in and out.
Author: www.oceanlabz.in
Modification: 1/4/2025
*/

const int ledPin = 2; // Use GPIO 2 or any other PWM-capable pin

void setup() {
  pinMode(ledPin, OUTPUT);  // Set LED pin as output
}

void loop() {
  for (int i = 0; i <= 360; i++) {
    // Convert angle to radians and calculate smooth brightness using cosine function
    float radians = i * 3.1416 / 180.0;
    int brightness = (int)(127.5 * (1 - cos(radians)));  // Range: 0 to 255
    analogWrite(ledPin, brightness);  // Set PWM duty
    delay(10);  // Adjust speed of breathing
  }
}
Explanation
- The code uses a cosine wave to smoothly vary LED brightness, mimicking a breathing pattern.
- analogWrite() adjusts brightness between 0–255 in each loop cycle for smooth fading.
- This creates a calming light pulse ideal for indicators or ambient lighting.
Troubleshooting
- LED not lighting up? Ensure the LED is connected to a PWM-capable pin like GPIO 2.
- Using ESP32? Replace
analogWrite()withledcWrite()setup, asanalogWrite()isn’t supported natively. - Effect too fast or slow? Adjust the
delay(10)value to change breathing speed.
Project 2: ESP32 Web-Based LED Brightness Controller with Slider UI
Introduction
This project uses an ESP32 with a web-based slider to control the brightness of an LED in real time.
It creates a simple web server that hosts a stylish UI with a round slider for interactive brightness control.
The ESP32 adjusts the LED using PWM (Pulse Width Modulation) based on user input from the browser.
It demonstrates seamless IoT-based LED dimming through Wi-Fi connectivity and live browser control.
Required Components
- ESP32 Board
- LED
- 220Ω Resistor
- Jumper Wires
- Breadboard
- Wi-Fi Network (2.4 GHz)
Code / Programming
/*
Filename: ol_web_led_pwm_control.ino
Description: ESP32 Web Server with a slider to control LED brightness using PWM on GPIO2.
Author: www.oceanlabz.in
Modification: 1/4/2025
*/

#include <WiFi.h>
#include <WebServer.h>

// WiFi Credentials
const char* ssid = "YOUR_SSID";
const char* password = "YOUR_PASSWORD";

// Web server running on port 80
WebServer server(80);

// PWM parameters
const int ledPin = 2;
const int pwmChannel = 0;
const int freq = 5000;
const int resolution = 8; // 0-255

void handleSet();

void setup() {
  Serial.begin(115200);

  // Set up PWM
  ledcSetup(pwmChannel, freq, resolution);
  ledcAttachPin(ledPin, pwmChannel);
  ledcWrite(pwmChannel, 128);  // Default brightness

  // Connect to Wi-Fi
  WiFi.begin(ssid, password);
  Serial.print("Connecting to WiFi");
  while (WiFi.status() != WL_CONNECTED) {
    delay(500);
    Serial.print(".");
  }
  Serial.println("\nConnected! IP: ");
  Serial.println(WiFi.localIP());

  // Define server routes
  server.on("/", handleRoot);
  server.on("/set", handleSet);
  server.begin();
  Serial.println("Web server started.");
}

void loop() {
  server.handleClient();
}

// Serve HTML UI
void handleRoot() {
  server.send(200, "text/html", R"rawliteral(
<!DOCTYPE html>
<html>
<head>
  <meta name="viewport" content="width=device-width, initial-scale=1">
  <title>LED Brightness Knob</title>
  <style>
    body {
      font-family: 'Segoe UI', sans-serif;
      text-align: center;
      background: linear-gradient(to right, #1f4037, #99f2c8);
      color: white;
      padding-top: 40px;
    }
    .label {
      font-size: 20px;
      margin-top: 10px;
    }
    #slider {
      margin: 20px auto;
    }
  </style>
</head>
<body>
  <h2>LED Brightness Knob</h2>
  <div id="slider"></div>
  <p class="label">Brightness: <span id="val">128</span></p>

  <script>
    const slider = document.createElement('input');
    slider.type = 'range';
    slider.min = 0;
    slider.max = 255;
    slider.value = 128;
    slider.style.width = '250px';
    slider.oninput = function () {
      document.getElementById('val').innerText = this.value;
      fetch("/set?value=" + this.value);
    };
    document.getElementById("slider").appendChild(slider);
  </script>
</body>
</html>
)rawliteral");
}

// Handle brightness update
void handleSet() {
  if (server.hasArg("value")) {
    int val = server.arg("value").toInt();
    val = constrain(val, 0, 255);
    ledcWrite(pwmChannel, val);  // Set brightness
    server.send(200, "text/plain", "Brightness set to " + String(val));
  } else {
    server.send(400, "text/plain", "Missing value");
  }
}
Accessing the Web Server
After uploading the sketch, open the Serial Monitor at 115200 baud and press the RESET button on the ESP32. If everything is fine, it will display the dynamic IP address obtained from your router as well as the “Web server started” message.

Next, launch a browser and navigate to the IP address displayed on the serial monitor. You’ll see a webpage with a brightness slider—adjust the slider to change the LED’s brightness in real-time.

Explanation
- The ESP32 hosts a Wi-Fi web server with a slider UI to control LED brightness.
- PWM output adjusts the LED brightness based on the slider’s value (0–255).
- Uses
ledcWrite()for smooth and precise dimming on PWM-capable GPIO 2.
Troubleshooting
- LED not responding? Make sure the LED is connected to a proper PWM pin (like GPIO 2).
- Page not loading? Confirm Wi-Fi credentials and connect to the correct local IP shown in Serial Monitor.
- Slider changes but no effect? Ensure you’re using
ledcWrite()and notanalogWrite()for ESP32.

