Index
Introduction
The Soil Moisture Sensor measures the water content in soil by outputting analog values that vary based on moisture levels. When connected to an ESP32, you can read these values to automate irrigation systems or trigger alerts. In this tutorial, we’ll learn how to connect the sensor to the ESP32 and monitor soil moisture effectively.
Required Components
- ESP32 Board
- Soil Sensor
- Jumper Wires
- Breadboard (optional)
Pinout

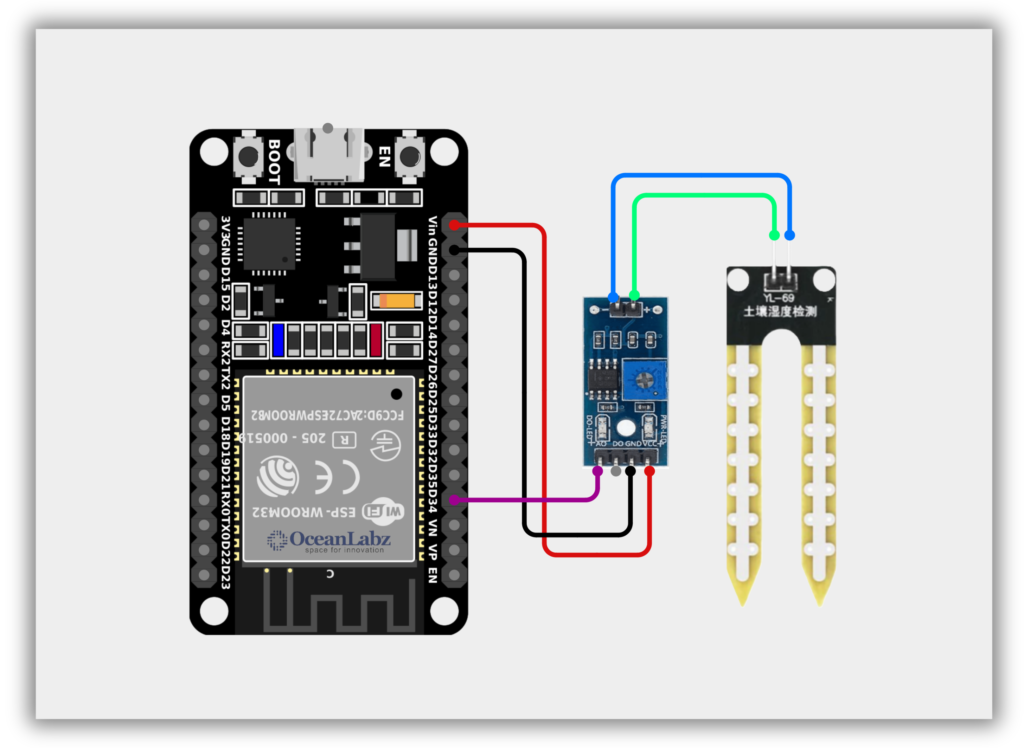
Circuit Diagram / Wiring
- Soil Sensor VCC → VIN/5V (ESP32)
- Soil Sensor GND → GND (ESP32)
- Soil Sensor Analog → GPIO 34 (ESP32)
Code / Programming
/*****************************************************
 * Project     : Soil_Moisture_Sensor_Monitor.ino
 * Description : Reads analog values from a soil moisture sensor
 *               and converts it to percentage for display.
 * Author      : www.oceanlabz.in
 * Modified    : 1/4/2025
 *****************************************************/

#define MoisturePin 34  // Use any ADC-capable pin like 34, 35, 32, etc.

void setup() {
  Serial.begin(115200);  // ESP32 commonly uses 115200 baud
}

void loop() {
  int soilMoistureValue = analogRead(MoisturePin);  // Read raw analog value (0-4095 on ESP32)

  // Optional: Convert to percentage (roughly)
  int moisturePercent = map(soilMoistureValue, 4095, 0, 0, 100);  // Adjust based on dry/wet calibration

  Serial.print("Soil Moisture Level: ");
  Serial.print(moisturePercent);
  Serial.println("%");

  delay(1000);
}
Explanation
- The ESP32 reads soil moisture using an analog-capable pin (e.g., GPIO 34).
- The sensor output is mapped to a percentage to represent moisture levels.
- The moisture value is displayed on the Serial Monitor every second.
Troubleshooting
- Incorrect readings? Make sure you’re using an ADC-capable pin (e.g., GPIO 34, 35, 32, or 33).
- Always reading 0 or 4095? Check sensor wiring and power supply (usually 3.3V for ESP32).
- Unstable values? Place the sensor properly in the soil and avoid shorting the probes with water.
Project 1: ESP32 Soil Moisture Web Monitor
Introduction
This project uses an ESP32 and a soil moisture sensor to monitor soil conditions in real-time.
It connects to Wi-Fi and hosts a web page that displays the current moisture level with emojis.
The sensor reads analog values from soil and categorizes them as Dry, Medium, or Moist.
The webpage auto-refreshes every 5 seconds to show updated soil status.
Required Components
- ESP32 Board
- Soil Sensor
- Jumper Wires
- Breadboard (optional)
- Wi-Fi Network (2.4 GHz)
Code / Programming
/*
Filename    : esp32_soil_moisture_web.ino
Description : ESP32-based WiFi Web Server to monitor soil moisture.
              Displays live analog readings and emoji-based status on a web interface.
Author      : www.oceanlabz.in
Modification: 1/4/2025
*/

#include <WiFi.h>
#include <WebServer.h>

// Wi-Fi credentials
const char* ssid = "YOUR_SSID";
const char* password = "YOUR_PASSWORD";

// Sensor & web config
#define SOIL_PIN 34  // ADC pin
WebServer server(80);

// Thresholds (tune based on your sensor!)
#define DRY_THRESHOLD 2800  // above this = dry
#define WET_THRESHOLD 1800  // below this = wet

String getSoilEmoji(int value) {
  if (value < WET_THRESHOLD)
    return "🌿 Moist";
  else if (value > DRY_THRESHOLD)
    return "🟫 Dry";
  else
    return "🌱 Medium";
}

void handleRoot() {
  int soilVal = analogRead(SOIL_PIN);
  String emoji = getSoilEmoji(soilVal);

  String html = "<!DOCTYPE html><html><head><meta charset='utf-8'>";
  html += "<meta http-equiv='refresh' content='5'>";
  html += "<title>Soil Moisture</title>";
  html += "<style>body{font-family:sans-serif;text-align:center;background:#222;color:#fff;}</style>";
  html += "</head><body>";
  html += "<h1>Soil Moisture Monitor</h1>";
  html += "<h2 style='font-size:80px'>" + emoji + "</h2>";
  html += "<p>Analog Reading: <b>" + String(soilVal) + "</b></p>";
  html += "<p>Auto-refreshes every 5 seconds</p>";
  html += "</body></html>";

  server.send(200, "text/html", html);
}

void setup() {
  Serial.begin(115200);
  delay(1000);

  pinMode(SOIL_PIN, INPUT);

  // Connect WiFi
  WiFi.begin(ssid, password);
  Serial.print("Connecting to WiFi");
  while (WiFi.status() != WL_CONNECTED) {
    delay(500); Serial.print(".");
  }

  Serial.println("\nConnected! IP: " + WiFi.localIP().toString());

  server.on("/", handleRoot);
  server.begin();
}

void loop() {
  server.handleClient();
}
Accessing the Web Server
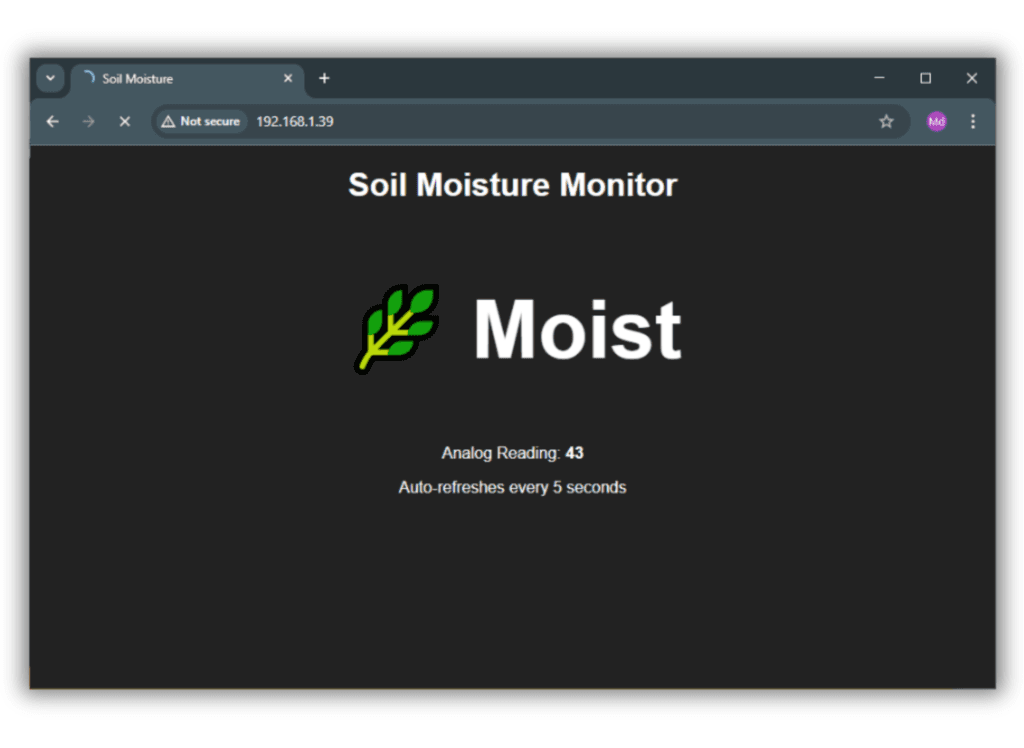
After uploading the sketch, open the Serial Monitor at 115200 baud and press the RESET button on the ESP32. If everything is fine, it will display the dynamic IP address obtained from your router as well as the “Connected, IP….” message.
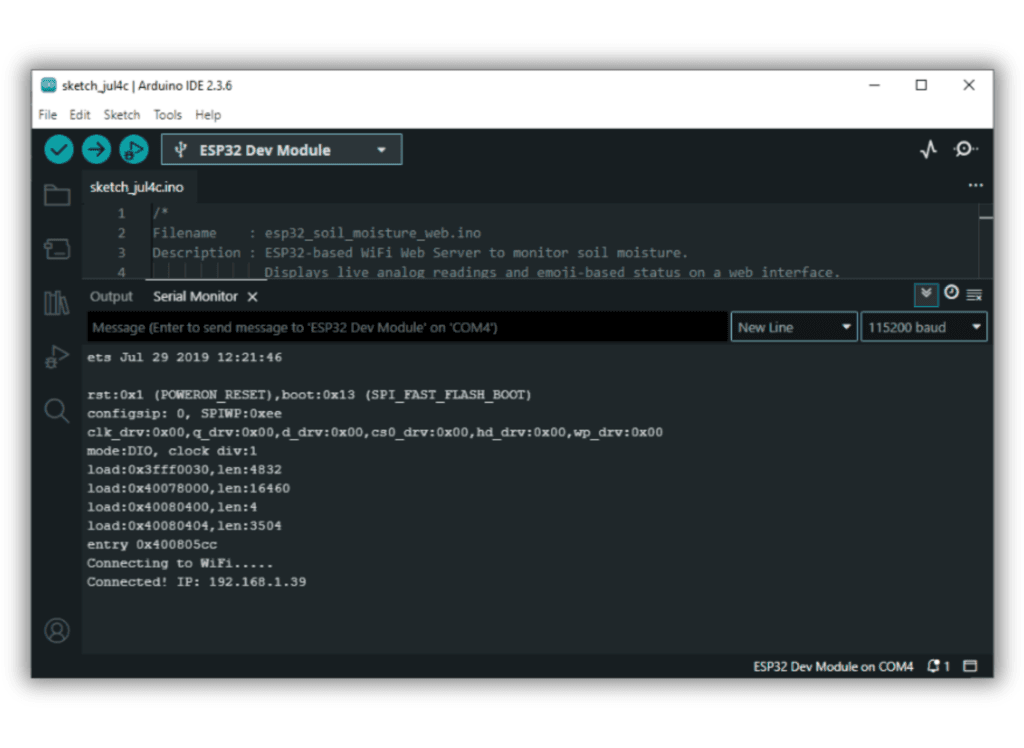
Next, launch a browser and navigate to the IP address displayed on the Serial Monitor. You’ll see a webpage with a real-time display of soil moisture status, including an emoji indicator and analog sensor reading.
Explanation
- Reads analog soil moisture levels using an ADC pin on ESP32.
- Hosts a WiFi web server showing the moisture status (Dry/Medium/Moist) with emoji and live value.
- Webpage auto-refreshes every 5 seconds to update real-time soil data.
Troubleshooting
- Wi-Fi not connecting: Double-check SSID/password; ensure ESP32 is within range and WiFi is 2.4GHz.
- Analog value always high or low: Sensor may be wired incorrectly or needs calibration.
- Webpage not loading: Ensure ESP32 IP is correct and your device is on the same Wi-Fi network.