Index
Introduction
The ESP32 is a versatile Wi-Fi + Bluetooth microcontroller capable of hosting a web server to control connected devices with ease.
In this project, we’ll create an ESP32 Web Server that allows you to control outputs — such as LEDs, relays, or motors — with a built-in timer function.
For demonstration, we’ll use the ESP32’s onboard LED (typically on GPIO 2), which can be switched ON or OFF from any web browser and set to automatically turn off after a specified duration.
Project Overview
We’ll connect an output device (LED) to the ESP32 and use an HTML-based web interface to:
- Turn the output ON or OFF manually.
- Set a timer (e.g., 5 seconds, 1 minute) after which the output automatically turns OFF.
Code / Programming
- Replace
YOUR_SSIDandYOUR_PASSWORDwith your Wi-Fi details. - Upload the code to the ESP32.
#include <WiFi.h>
#include <WebServer.h>

const char* ssid = "Home sweet home 2.4G";
const char* password = "Online@1234";

WebServer server(80);

const int ledPin = 2;  // Onboard LED
unsigned long timerEndMillis = 0;

void handleRoot() {
  String html = "<html><head><title>ESP32 LED Timer</title></head><body>";
  html += "<h2>ESP32 LED Control</h2>";
  html += "<p><a href=\"/on\"><button>Turn ON</button></a> ";
  html += "<a href=\"/off\"><button>Turn OFF</button></a></p>";
  html += "<form action=\"/timer\" method=\"GET\">";
  html += "Timer (seconds): <input type=\"number\" name=\"time\" min=\"1\">";
  html += "<input type=\"submit\" value=\"Set Timer\"></form>";
  html += "</body></html>";
  server.send(200, "text/html", html);
}

void handleOn() {
  digitalWrite(ledPin, HIGH);
  timerEndMillis = 0;
  server.sendHeader("Location", "/");
  server.send(303);
}

void handleOff() {
  digitalWrite(ledPin, LOW);
  timerEndMillis = 0;
  server.sendHeader("Location", "/");
  server.send(303);
}

void handleTimer() {
  if (server.hasArg("time")) {
    int seconds = server.arg("time").toInt();
    digitalWrite(ledPin, HIGH);
    timerEndMillis = millis() + (seconds * 1000);
  }
  server.sendHeader("Location", "/");
  server.send(303);
}

void setup() {
  Serial.begin(115200);
  pinMode(ledPin, OUTPUT);
  digitalWrite(ledPin, LOW);

  WiFi.begin(ssid, password);
  Serial.print("Connecting to WiFi...");
  while (WiFi.status() != WL_CONNECTED) {
    delay(500);
    Serial.print(".");
  }
  Serial.println("\nConnected! IP Address: ");
  Serial.println(WiFi.localIP());

  server.on("/", handleRoot);
  server.on("/on", handleOn);
  server.on("/off", handleOff);
  server.on("/timer", handleTimer);

  server.begin();
}

void loop() {
  server.handleClient();
  if (timerEndMillis > 0 && millis() > timerEndMillis) {
    digitalWrite(ledPin, LOW);
    timerEndMillis = 0;
  }
}
How to Use
Accessing the Web Server
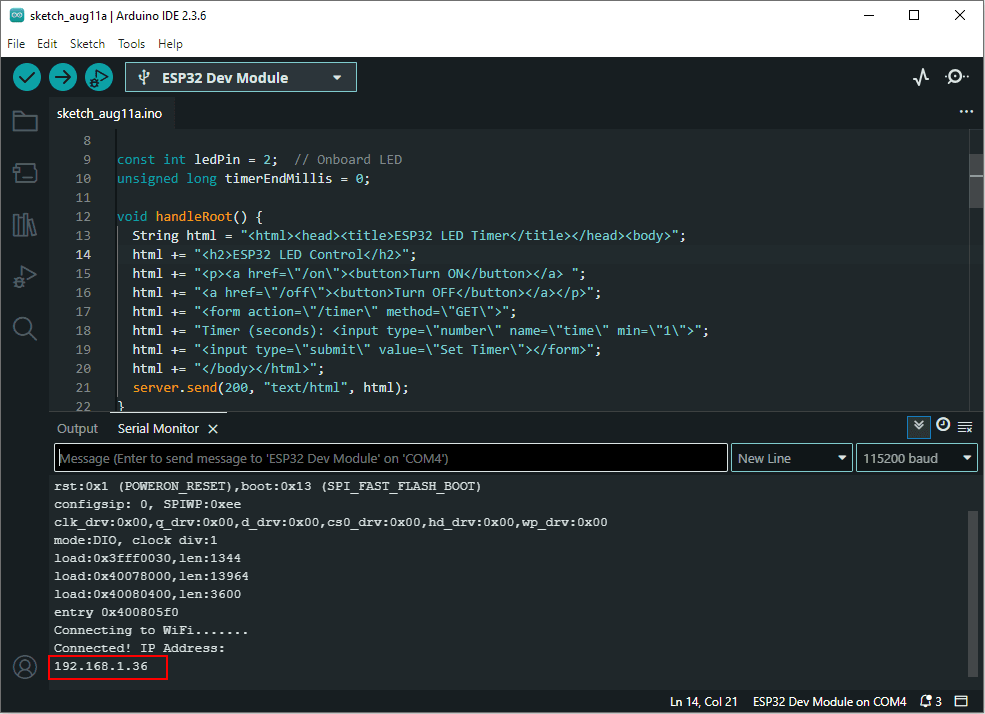
After uploading the sketch, open the Serial Monitor at 115200 baud and press the RESET button on the ESP32. If everything is fine, it will display the dynamic IP address.
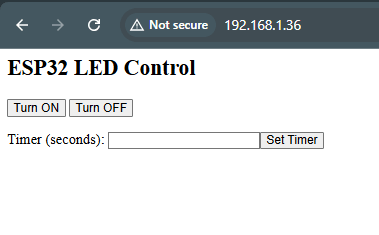
launch a browser and navigate to the IP address displayed on the serial monitor. You’ll see a webpage with awebpage with buttons to turn the onboard LED ON or OFF, and a timer input box where you can set the LED to automatically turn OFF after a specified number of seconds.

Comments (2)