Index
Introduction
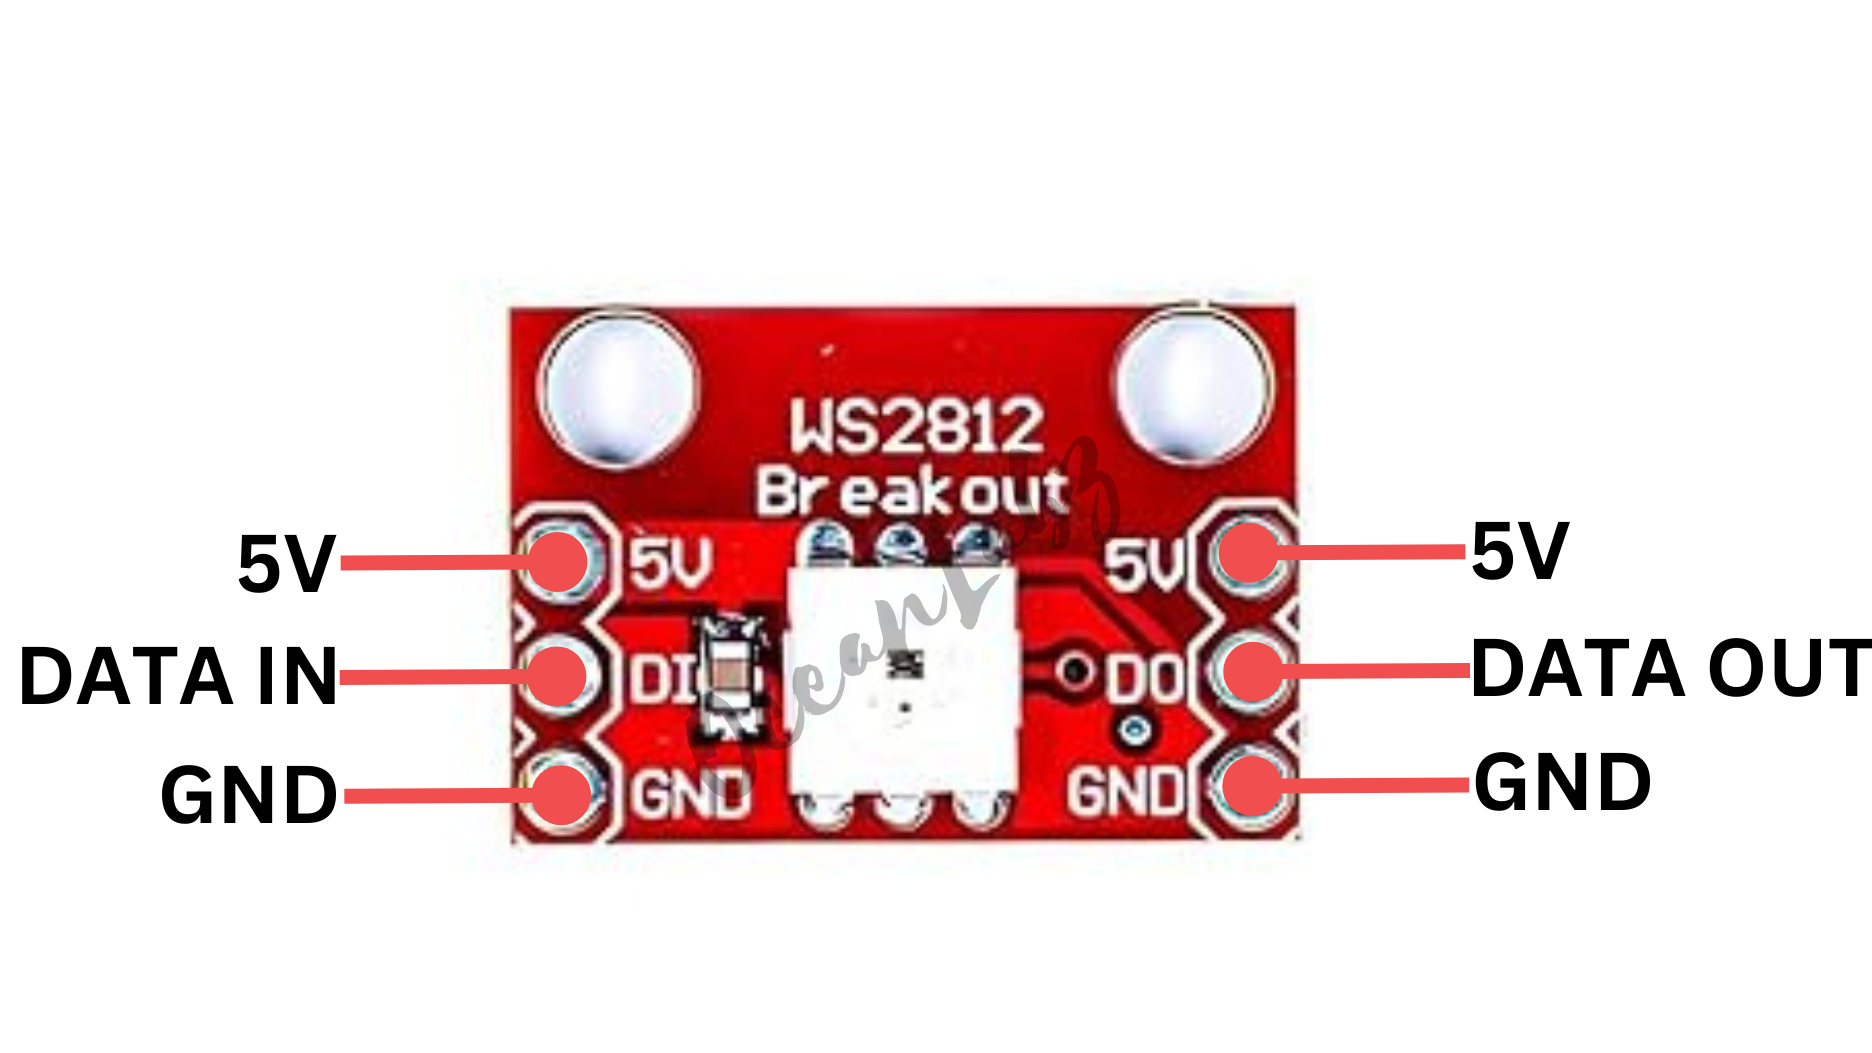
The WS2812 breakout board features individually addressable RGB LEDs, ideal for stunning lighting effects and animations.
With just a single data pin connected to the ESP32, you can control the color and brightness of each LED independently.
Perfect for projects like decorative lighting, visual indicators, and interactive displays using the ESP32.
Required Components
- ESP32 Board
- WS2812 breakout board
- Jumper wires
- Breadboard (optional)
- Power supply (if using multiple LEDs)
Pinout
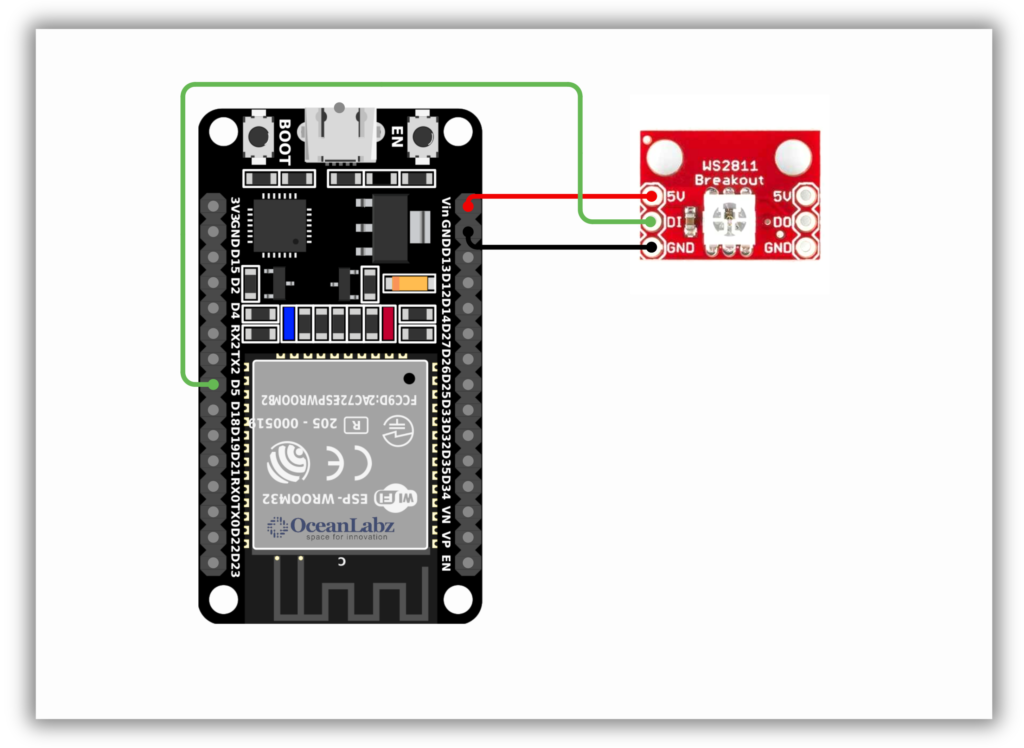
Circuit Diagram / Wiring
- WS2812 5V → VIN/5V (ESP32)
- WS2812 GND → GND (ESP32)
- WS2812 DI (Data IN) → Pin 5 (ESP32)
Code / Programming
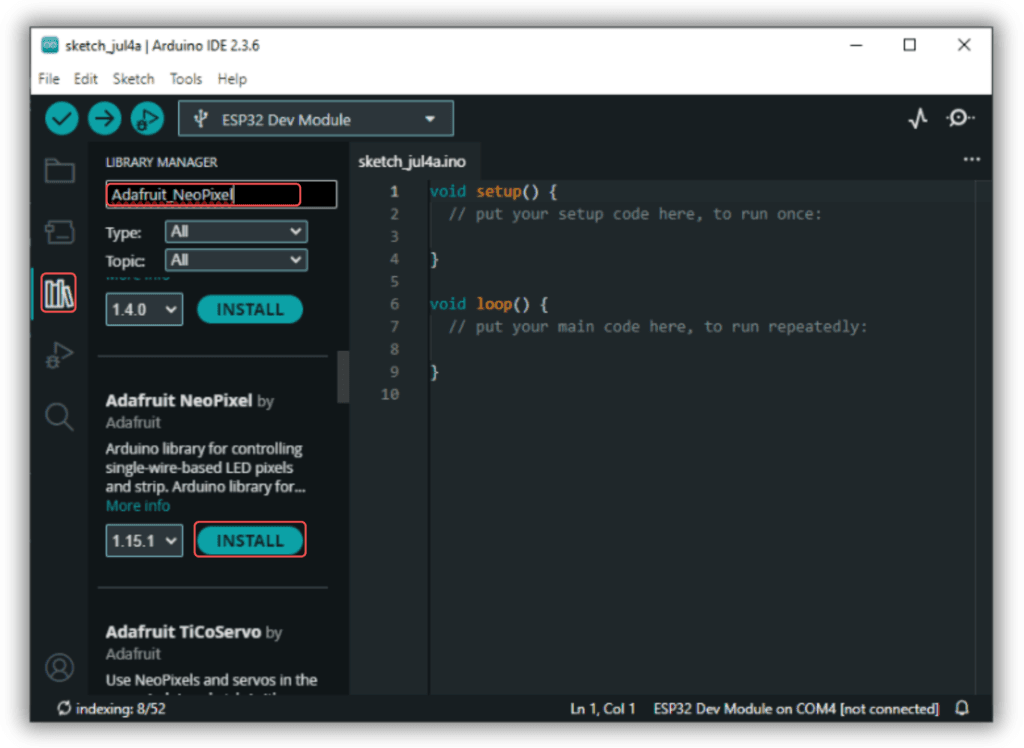
- Install Required Library (via Arduino Library Manager).
- Go to the “Libraries” tab on the left-hand side of the screen.
- Click on the “Library Manager” button (book icon) at the top of the Libraries tab.
- In the Library Manager window, type “Adafruit_NeoPixel” in the search bar.
- Locate the “Adafruit_NeoPixel” library click on the “Install” button next to it.
- Wait for the library to be installed, and you’re ready to use the Adafruit_NeoPixel library in your projects.
/*
  Filename: esp32_ws2812_effects.ino
  Description: Demonstrates rainbow, color wipe, solid color, and breathing effects using WS2812 LED with ESP32.
  Author: www.oceanlabz.in
  Modification: 1/4/2025
*/


#include <Adafruit_NeoPixel.h>

#define PIN            5    // Use a safe digital GPIO pin on ESP32
#define NUM_LEDS       1    // Number of WS2812 LEDs
#define DELAY_TIME     10   // Delay for Rainbow effect
#define BREATH_SPEED   10   // Speed for breathing effect

Adafruit_NeoPixel strip(NUM_LEDS, PIN, NEO_GRB + NEO_KHZ800);

// Array of colors for cycling
uint32_t colors[] = {
  strip.Color(255, 0, 0),   // Red
  strip.Color(0, 255, 0),   // Green
  strip.Color(0, 0, 255),   // Blue
  strip.Color(255, 255, 0), // Yellow
  strip.Color(0, 255, 255), // Cyan
  strip.Color(255, 0, 255)  // Magenta
};

void setup() {
  strip.begin();
  strip.show();  // Initialize all pixels to 'off'
}

void loop() {
  // Rainbow effect
  rainbowCycle();

  // Color wipe through defined colors
  for (int i = 0; i < 6; i++) {
    colorWipe(colors[i], 50);
    delay(1000);
  }

  // Display colors directly one by one
  for (int i = 0; i < 6; i++) {
    strip.setPixelColor(0, colors[i]);
    strip.show();
    delay(1000);
  }

  // Breathing effect in different colors
  breathingEffect(strip.Color(255, 0, 0), BREATH_SPEED);  // Red
  breathingEffect(strip.Color(0, 255, 0), BREATH_SPEED);  // Green
  breathingEffect(strip.Color(0, 0, 255), BREATH_SPEED);  // Blue
  breathingEffect(strip.Color(255, 255, 0), BREATH_SPEED);  // Yellow
}

// Rainbow cycle function
void rainbowCycle() {
  for (int hue = 0; hue < 256; hue++) {
    strip.setPixelColor(0, strip.ColorHSV(hue * 65536L / 256));
    strip.show();
    delay(DELAY_TIME);
  }
}

// Wipe a color across the LED
void colorWipe(uint32_t color, int wait) {
  for (int i = 0; i < NUM_LEDS; i++) {
    strip.setPixelColor(i, color);
    strip.show();
    delay(wait);
  }
}

// Smooth breathing effect
void breathingEffect(uint32_t color, int breathSpeed) {
  for (int brightness = 0; brightness <= 255; brightness++) {
    strip.setPixelColor(0, color);
    strip.setBrightness(brightness);
    strip.show();
    delay(breathSpeed);
  }
  for (int brightness = 255; brightness >= 0; brightness--) {
    strip.setPixelColor(0, color);
    strip.setBrightness(brightness);
    strip.show();
    delay(breathSpeed);
  }
}
Explanation
- WS2812 LEDs are individually addressable RGB LEDs controlled using a single digital pin on the ESP32.
- Each LED’s color and brightness can be set independently using the Adafruit NeoPixel library.
- Ideal for color effects, animations, and visual feedback in interactive ESP32 projects.
Troubleshooting
- If LEDs don’t light up, verify the data pin connection and ensure
strip.begin()is called insetup(). - Use a proper 5V power supply for the WS2812; ESP32’s 3.3V pin is not sufficient for LED power.
- If colors flicker or don’t respond, use a logic level shifter or a 330Ω resistor on the data line for signal reliability.
Project 1: WS2812 WiFi Control Color Picker
Introduction
This project uses an ESP32 as a WiFi web server to control a WS2812 RGB LED remotely.
Users can access a simple web interface to change the LED’s color and adjust its brightness in real time.
The interface includes an HTML color picker and a brightness slider for intuitive control.
It demonstrates the powerful combination of ESP32, WiFi, and NeoPixel for interactive IoT lighting.
Perfect for smart home lighting, decorative effects, or beginner-friendly IoT experiments.
Required Components
- ESP32 Board
- WS2812 breakout board
- Jumper wires
- Breadboard (optional)
- Power supply (if using multiple LEDs)
- Wi-Fi Network (2.4 GHz)
Code / Programming
/**********************************************************************
* Filename    : ws2812_wifi_control
* Description : ESP32-based WiFi Web Server for controlling a WS2812 RGB LED
*               Supports real-time color selection and brightness control
*               via a simple web interface
* Author      : www.oceanlabz.in
* Modification: 1/4/2025
**********************************************************************/


#include <WiFi.h>
#include <Adafruit_NeoPixel.h>
#include <WebServer.h>

#define LED_PIN 5
#define NUM_LEDS 1

const char* ssid = "YOUR_SSID";
const char* password = "YOUR_PASSWORD";

Adafruit_NeoPixel led(NUM_LEDS, LED_PIN, NEO_GRB + NEO_KHZ800);
WebServer server(80);

uint8_t brightness = 255;  // Full brightness by default
uint32_t currentColor = 0x00FF00; // Green by default

void updateLED() {
  uint8_t r = (currentColor >> 16) & 0xFF;
  uint8_t g = (currentColor >> 8) & 0xFF;
  uint8_t b = currentColor & 0xFF;

  r = map(r * brightness, 0, 255 * 255, 0, 255);
  g = map(g * brightness, 0, 255 * 255, 0, 255);
  b = map(b * brightness, 0, 255 * 255, 0, 255);

  led.setPixelColor(0, led.Color(r, g, b));
  led.show();
}

void handleRoot() {
  String html = R"rawliteral(
    <!DOCTYPE html><html><head><meta charset='UTF-8'>
    <title>LED Color + Brightness</title>
    <style>
      body { background: #1a1a1a; color: white; font-family: sans-serif; text-align: center; margin-top: 30px; }
      .container { display: flex; flex-direction: column; align-items: center; gap: 20px; }
      input[type=color] { width: 150px; height: 150px; border: none; cursor: pointer; }
      input[type=range] { width: 300px; }
      label { font-size: 18px; margin-top: 10px; }
    </style>
    </head><body>
    <div class="container">
      <h2>🎨 RGB LED Controller</h2>
      <input type="color" id="colorPicker" value="#00ff00">
      <label for="brightness">💡 Brightness</label>
      <input type="range" id="brightness" min="0" max="100" value="100">
    </div>
    <script>
      const colorPicker = document.getElementById("colorPicker");
      const brightnessSlider = document.getElementById("brightness");

      function sendUpdate() {
        const color = colorPicker.value.substring(1);
        const bright = brightnessSlider.value;
        fetch(`/set?color=${color}&brightness=${bright}`);
      }

      colorPicker.addEventListener("input", sendUpdate);
      brightnessSlider.addEventListener("input", sendUpdate);
    </script>
    </body></html>
  )rawliteral";

  server.send(200, "text/html", html);
}

void handleSet() {
  if (server.hasArg("color")) {
    String hex = server.arg("color");
    currentColor = strtol(hex.c_str(), NULL, 16);
  }
  if (server.hasArg("brightness")) {
    brightness = constrain(server.arg("brightness").toInt(), 0, 100);
    brightness = map(brightness, 0, 100, 0, 255);
  }
  updateLED();
  server.send(200, "text/plain", "OK");
}

void setup() {
  Serial.begin(115200);
  led.begin();
  led.show();

  WiFi.begin(ssid, password);
  Serial.print("Connecting to WiFi");
  while (WiFi.status() != WL_CONNECTED) {
    delay(500); Serial.print(".");
  }
  Serial.println("\nConnected! IP: " + WiFi.localIP().toString());

  server.on("/", handleRoot);
  server.on("/set", handleSet);
  server.begin();
}

void loop() {
  server.handleClient();
}
Accessing the Web Server
After uploading the sketch, open the Serial Monitor at 115200 baud and press the RESET button on the ESP32. If everything is fine, it will display the dynamic IP address obtained from your router as well as the “Connected, IP….” message.

Next, launch a browser and navigate to the IP address displayed on the Serial Monitor. You’ll see a webpage with a color picker and a brightness slider that lets you control the WS2812 RGB LED in real-time over Wi-Fi.
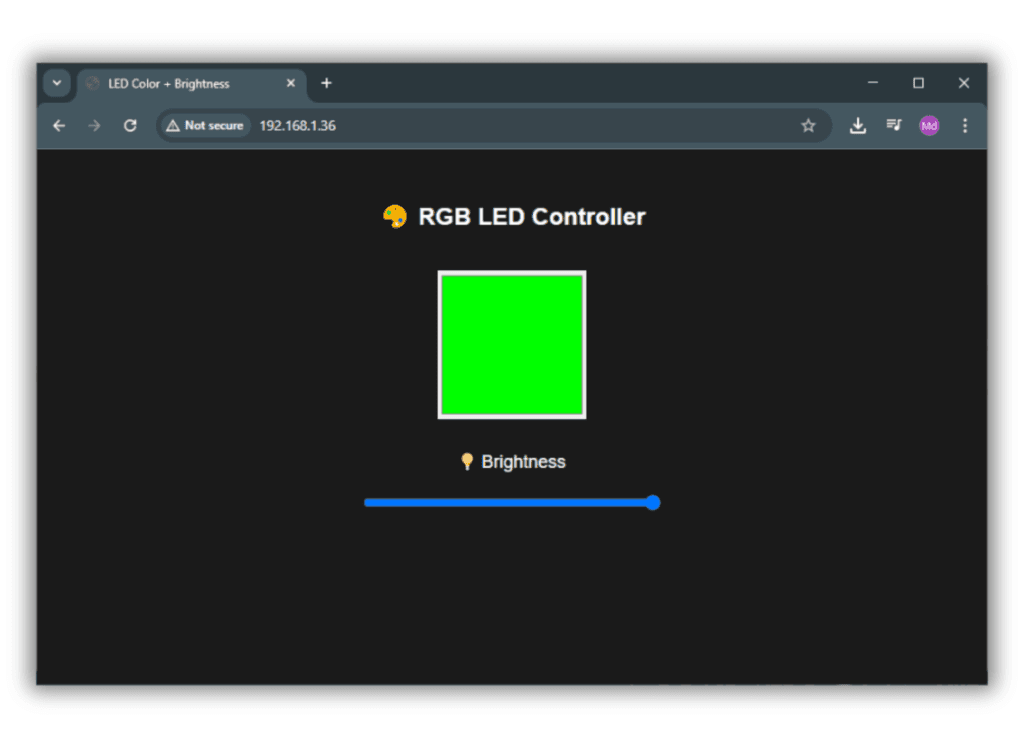

You can:
- Select any color using the color picker
- Adjust LED brightness from 0% to 100%
- See changes instantly reflected on the LED without refreshing the page
Make sure your ESP32 and the device running the browser are connected to the same Wi-Fi network.
Explanation
- The ESP32 hosts a WiFi web server that allows users to control a WS2812 RGB LED from any browser.
- A color picker and brightness slider on the webpage send commands to update the LED in real time.
- The LED color is set using the Adafruit NeoPixel library, and brightness is scaled accordingly.
Troubleshooting
- Make sure LED data pin and GND are correctly wired to the ESP32 (GPIO 5 by default).
- Check WiFi credentials and connect your device to the same network as the ESP32.
- If the web page doesn’t work, use the IP shown in Serial Monitor and reload in a modern browser.