Index
Welcome to Part 1 of this step-by-step guide on building a mini AI voice assistant using the powerful ESP32 microcontroller and cloud AI services like Whisper, ChatGPT, and ElevenLabs. This series will walk you through each module piece by piece, so you can test along the way and build confidence before running the final integrated code.
The Core Philosophy
The ESP32 is a highly capable “System on a Chip” (SoC), but it doesn’t have the massive computing power required to run Large Language Models (LLMs) like GPT-4 locally. Instead, we use a Client-Server Architecture:
- The ESP32 (The Client): Handles real-time hardware tasks like recording audio, connecting to Wi-Fi, and playing sound.
- The Cloud (The AI Brain): Handles the “heavy lifting”—transcribing audio, reasoning through text, and generating synthetic speech.
What You’re Building
Imagine a device that:
- Listens to your voice
- Understands what you say
- Talks back to you with AI-generated responses
- All packed inside a compact ESP32 system.
This project uses cloud AI for processing and generation, meaning the heavy lifting is done online, while your ESP32 handles audio and connectivity.
Meet the Hardware Trio
To build this assistant, we focus on three primary hardware interfaces:
| Component | Role | Protocol |
| ESP32-S3/ESP32-C3/ESP32 | The Brain & Controller | Wi-Fi / I²S |
| INMP441 Mic | The Ears (Audio Input) | I²S (Digital) |
| MAX98357A DAC | The Voice (Audio Output) | I²S (Digital) |
Note: We use the I²S (Inter-IC Sound) protocol because it allows for high-quality digital audio transfer without the interference and noise common in older analog circuits.
The 6-Step Interaction Flow
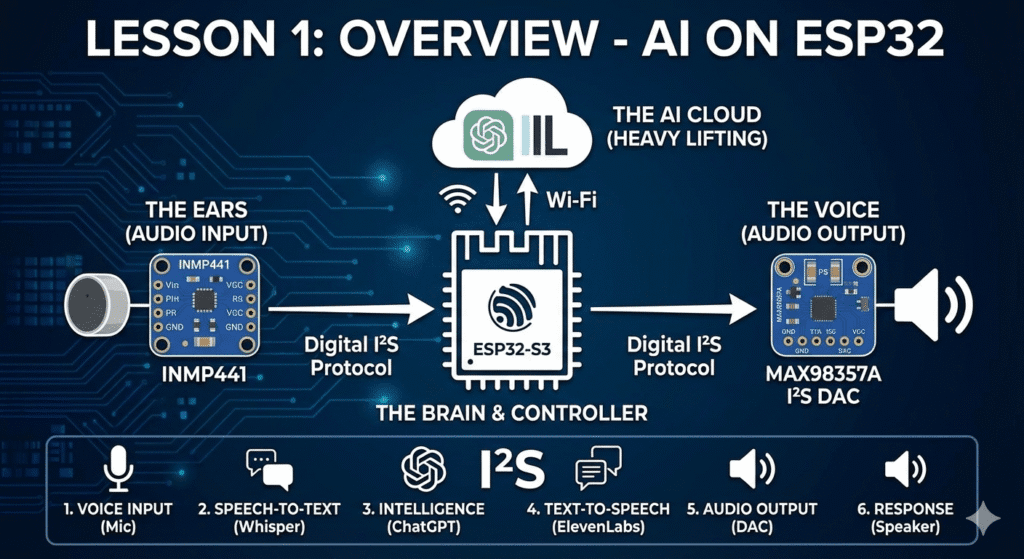
When you speak to your assistant, the data follows a specific “round-trip” journey through the cloud:
- Voice Input: Your voice is captured as digital data by the INMP441 microphone.
- Speech-to-Text (STT): The ESP32 streams this audio to OpenAI Whisper, which turns the sound into text.
- Intelligence: That text is sent to ChatGPT, which decides what the response should be.
- Text-to-Speech (TTS): The text response is sent to ElevenLabs, which generates a high-fidelity, human-like voice file.
- Audio Output: The ESP32 receives the audio file and sends it to the DAC.
- Physical Response: The DAC converts the data back into electrical signals that move the speaker’s cone, and the assistant “speaks.”
What You’ll Need
Before the next lesson, make sure you have:
Hardware
✔ ESP32-S3/ESP32/ESP-C3
✔ INMP441 digital microphone
✔ I²S DAC (like MAX98357A) + speaker
✔ Wires, breadboard, + button (optional)
Software
✔ Arduino IDE
✔ API keys for:
- OpenAI (for Whisper + ChatGPT)
- ElevenLabs (for TTS)